August 28, 2009

Mediterranean Eggplant and Quinoa Salad


I've been wanting to try quinoa for a while, and I finally got around to it this week. Besides learning how to cook it, I also learned how to pronounce it...which, believe me, is a much harder task. How am I supposed to know that "quin-noa" is actually pronounced "keen-wa?" Good thing I've been saying quin-noa my whole life without anyone correcting me. Ya know, I absolutely loooove mispronouncing words in front of my coworkers and stuff.

Like its pronunciation, quinoa also looks deceptive. I mean, just look at the picture -- you can't even try to tell me that looks appetizing! But surprisingly, it's really delicious. And healthy, which is double bonus points in my book:

1 C white rice: 4 grams protein, 1 gram fiber
1 C brown rice: 5 grams protein, 4 grams fiber
1 C quinoa: 8 grams protein, 5 grams fiber

I think what makes this dish so tasty is the eggplant. We LOVE eggplant, especially the soft, succulent, melt-in-your-mouth kind. Couple this with some hearty quinoa, spicy red onions, juicy tomatoes, lemon juice, and fresh mint -- and you have a wonderfully complex "salad" that fills you up within a couple of mouthfuls. Sounds like a winner to me :)

Mediterranean Eggplant and Quinoa Salad
Adapted from Gourmet, September 2006

1 1/2 lb eggplant, cut into 1-inch cubes
3/4 lb zucchini, cut into 1-inch cubes
10 T extra virgin olive oil
1 t salt
1 t black pepper
1 C chopped scallion (from 1 bunch)
1 1/2 t ground cumin
1/2 t ground coriander
1/4 t cayenne pepper
1 C quinoa
1 1/3 C chicken broth
2 T fresh lemon juice
1 garlic clove, minced
1/4 t sugar
1/2 lb cherry tomatoes, quartered
1/2 C thinly sliced red onion
1/2 C chopped fresh mint

Roast eggplant and zucchini:
Put oven racks in upper and lower thirds of oven and preheat oven to 425°F.

Toss eggplant and zucchini with 5 tablespoons oil, 3/4 teaspoon salt, and 3/4 teaspoon pepper in a bowl, then spread in 2 oiled large shallow (1-inch-deep) baking pans. Roast vegetables in oven, stirring occasionally and switching position of pans halfway through baking, until vegetables are golden brown and tender, 20 to 25 minutes total. Combine vegetables in 1 pan and cool, reserving other pan for cooling barley.

Cook quinoa:
Heat 2 tablespoons oil in a 3- to 4-quart heavy pot over moderately high heat until hot but not smoking, then cook scallion, cumin, coriander, and cayenne, stirring, until fragrant, about 1 minute. Add barley and cook, stirring until well coated with oil, 2 minutes more. Add broth and water and bring to a boil. Reduce heat and simmer, covered, until all of liquid is absorbed and barley is tender, 30 to 40 minutes. Remove from heat and let stand, covered, 5 minutes. Transfer to reserved shallow baking pan and spread to quickly cool, uncovered, to room temperature, about 20 minutes.

Make dressing and assemble salad:
Whisk together lemon juice, garlic, sugar, and remaining 1/4 teaspoon salt, 1/4 teaspoon pepper, and 3 tablespoons oil in a large bowl. Add barley, roasted vegetables, and remaining ingredients to bowl with dressing and toss until combined well. Serve with cheese slices.

Continue reading for recipe...

August 24, 2009

Peanut Butter Cookies


I don't know if I'm just drawn to minimalistic, simple foods....or have become really, really lazy recently. This was the second time I've made cookies, and the second time only 5 ingredients were required. I'd like to think that was intentional -- an attempt to participate in the growing "all natural, less is more" food trend. Either way, it meant that I didn't have to leave my kitchen to get more ingredients from the grocery store. Which is great if you don't have a car (or can't drive your husband's because it's a $@%!# stick shift).

Anyway, I digress. This weekend we were meeting our lovely photographer to go over wedding pictures, so of course we couldn't show up empty handed. I mean, besides being a wonderful friend...our good/bad looks totally depended on him! :) So I chose to make him peanut butter cookies because he is ridiculously busy (10 hour wedding shoot after our meeting, jetting off to korea for another gig the next day), and will need a good solid protein like peanut butter to keep him going.

Though I was able to save a couple for us, they all managed to mysteriously disappear by the end of the weekend. Fancy that. They are ridiculously peanut buttery, and have a very soft melt-in-your-mouth texture. Made without butter or flour, I'm almost 100% certain my good friend, Ye, would say they're healthy for you. Ummmm...does that mean I can load up on these low carb goodies next time? ;)


Best Peanut Butter Cookies Ever
Adapted from All Recipes

2 C peanut butter (all natural, old-fashioned kind)
2 C sugar
2 eggs
2 t baking soda
1 t vanilla extract

Preheat oven to 350 degrees. In a medium bowl, stir peanut butter and sugar together until smooth. Beat in the eggs, one at a time, then stir in the baking soda, salt, and vanilla. Roll dough into 1 inch balls and place them 2 inches apart onto the prepared cookie sheets. Lightly press a criss-cross into the top using the back of a fork.

Bake for about 8 minutes in the preheated oven. Allow cookies to cool on baking sheet for 5 minutes before removing to a wire rack to cool completely.

Note: I would probably add chocolate chips next time to cut the intense peanut butter taste.
Continue reading for recipe...

August 20, 2009

Easy Chicken Enchiladas


Saucy, homey, and always comforting -- I love me a good casserole. Not only does it feed and soothe the soul, but it also makes A TON of leftovers...which is always a welcome sight after a loooong day of work.


I'm not quite sure chicken enchiladas really qualifies as a real casserole dish...but they're bubbly, saucy and baked in one of those 9x13 inch Pyrex dishes (that has to count!). However, this is not your typical bread crumb, cream of mushroom casserole. In fact, besides the melted cheese -- nothing about it resembles the heavy butter and cream mixture that most casseroles are known for.

Instead, the chunky enchilada sauce is full of fresh tomatoes, onions and chopped chipotles (which give it a great smoky kick). And unlike the greasy, skimpy enchilada fillings that are so frequently served at Mexican restuarants, these are bursting with shredded chicken, fresh cilantro, chopped onion and of course, cheese.


To me, the corn tortilla is what brings it all together. Slightly crisped in a frying pan, the tortillas are wrapped around the chicken filling before everything gets covered in the enchilada sauce and cheese. Amazingly, they're able to retain their slightly chewy texture, which compliments all the saucy goodness wonderfully.

Who's excited for lunch, dinner, and dinner again these next couple of days? :)


The Great After-Thanksgiving Turkey Enchiladas
Adapted from Bon Appetit, November 1998

3 T plus 1/4 C vegetable oil
1 3/4 C finely chopped onions
1 28-oz can enchilada sauce (we used HOT)
5 tomatoes, finely chopped
1 1/2 t finely chopped canned chipotle chilies
1 C chopped fresh cilantro

3 C coarsely shredded chicken (used a rotisserie chicken from Safeway/Costco)
3 C grated Monterey Jack cheese
3/4 C lowfat sour cream

Heat 3 tablespoons oil in large saucepan over medium heat. Add 1 1/2 cups onions and sauté until tender, about 5 minutes. Add enchilada sauce, tomatoes and chipotles. Cover; simmer 20 minutes, stirring often. Remove from heat. Stir in 1/2 cup cilantro. Season sauce with salt and pepper. Mix turkey, 2 cups cheese, sour cream, 1/4 cup onions and 1/2 cup cilantro in bowl. Season with salt and pepper.

Preheat oven to 350°F. Heat 1/4 cup vegetable oil in medium skillet over medium heat. Cook 1 tortilla until pliable, about 20 seconds per side. Drain on paper towels. Repeat with remaining tortillas.

Spread 1/2 cup sauce in 13 x 9 x 2-inch glass baking dish. Spoon 1/4 cup turkey mixture in center of each tortilla. Roll up tortillas. Arrange seam side down in dish. Spoon 2 1/2 cups sauce over enchiladas. Sprinkle with 1 cup cheese. Bake enchiladas until heated through, about 30 minutes. Rewarm remaining sauce in saucepan over medium-low heat. Transfer to sauceboat. Serve enchiladas, passing sauce separately.

Continue reading for recipe...

August 16, 2009

Vanilla Coconut Cupcakes


I've been dying to try this recipe ever since I first laid eyes on it, and I finally got a chance to make it this weekend. I'm so glad I did, because it did NOT disappoint :)


The occasion was actually for our friend's "Sushi Fest" dinner party, where we were to bring an Asian-themed dessert. I immediately thought of this recipe...coconut is totally Asian, right?? To amp up the "orientalness" of this dessert, I served it with green tea ice cream which surprisingly turned out to be a great idea! Who knew coconut and matcha green tea worked so well together?


The cupcake itself exceeded my expectations. The secret to its success? Reduced coconut milk which yields an incredibly moist, slightly denser cupcake. I was afraid the coconut flavor would be too intense/overwhelming for my tastes, but it was actually really subtle. I also loved seeing little brown specks of vanilla scattered throughout the cake. I hardly ever use real vanilla beans when baking (they're expensive and vanilla extract usually does the trick), so it's always exciting when I use them and can actually see little specks of them in the final product! :P

Anyway, AC likes these better than my beloved red velvet cupcakes. I haven't decided which one takes the cake yet, but both are definitely up there!


Vanilla Bean-Coconut Cupcakes with Coconut Frosting
Bon Appetit, April 2009

2 13-14 oz cans unsweetened coconut milk

2 C all purpose flour
2 1/4 t baking powder
1/4 t salt
3/4 C unsalted butter, room temperature
1 1/3 C sugar
3 large eggs
Seeds scraped from 1 split vanilla bean (or 1 1/2 t vanilla extract)
1 C reduced coconut milk, room temperature

1 C unsalted butter, room temperature
2 C powdered sugar
1/3 C reduced coconut milk, room temperature
1 1/2 t vanilla extract
1 C sweetened flaked coconut, lightly toasted (for garnish)

For reduced coconut milk:
Bring coconut milk to boil in large deep saucepan over medium-high heat. Reduce heat to mediumlow; boil until reduced to 1 1/2 cups, stirring occasionally, 30 to 45 minutes. Remove from heat; cool completely. Transfer to small bowl.

For cupcakes:
Position rack in center of oven; preheat to 350 degrees. Line eighteen 1/3-cup muffin cups with paper liners. Whisk flour, baking powder, and salt in medium bowl. Using electric mixer, beat butter in large bowl until smooth. Add sugar; beat on medium-high speed until well blended, about 2 minutes. Add 2 eggs, 1 at a time, beating well after each addition and occasionally scraping down sides of bowl. Beat in seeds from vanilla bean and remaining egg. Add half of flour mixture; mix on low speed just until blended. Add 1 cup reduced coconut milk; mix just until blended. Add remaining flour mixture; mix on low speed just until blended. Divide batter among muffin cups. Bake cupcakes until tops spring back when gently touched and tester inserted into center comes out clean, about 15 minutes. Transfer cupcakes in pans to rack; cool 10 minutes. Carefully remove cupcakes from pans and cool completely on rack.

For frosting:
Using electric mixer, beat butter in large bowl until smooth. Add sugar, 1/3 cup reduced coconut milk, seeds from vanilla bean, and salt. Beat on medium-low speed until blended, scraping down sides of bowl. Increase to mediumhigh and beat until light and fluffy.
Continue reading for recipe...

August 14, 2009

Korean Oxtail Soup (Gori Gomtang)


Oxtail Soup is a dish that makes a lot of my Korean friends' eyes light up when mentioned. They go craaaaazy over it -- and for good reason. The incredibly tender, fall-off-the-bones meat make it a satisfying meal. And the flavorful broth swirling with bits of soft daikon and crisp green onion really is simplicity in its best form.

We eat this with white rice, which when dunked in the brothy goodness, soaks up the flavors of the soup wonderfully. It's also delicious with a "refreshing" side of hot peppers dipped in a fiery red pepper paste, which contrasts the delicate soup perfectly. And of course, no (real) Korean meal is complete without the infamous kimchi :P


Unfortunately, I don't have a recipe to share for this post. AC usually cooks with his taste buds, and I completely forgot to document everything down when he was making this! Next time, however, I promise -- pen and paper will be in hand...
Continue reading for recipe...

August 12, 2009

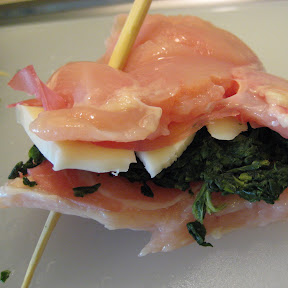
Chicken Stuffed With Prosciutto, Spinach and Mozzarella


What do you do when you have a couple of chicken breasts, some frozen spinach, and leftover cheese and prosciutto in your fridge? Why make stuffed chicken breasts, of course! ;)

Given the economic climate, AC and I have been trying our best to stay as prudent about our expenses as possible. We hardly eat out (you'll know when we blog about it), and we do our best to ensure nothing gets wasted (it expired last week? it's fiiiiine). This post is no exception. While stuffed chicken is not one of the sexier, more inspirational dishes out there -- it is certainly fast, economical, and healthy.


When I said what do you do with a couple of chicken breasts, some frozen spinach, and leftover cheese and prosciutto.... I, literally, really meant it. Take all the garbage -- I mean leftovers -- from your fridge and stuff it into a chicken breast. It actually tastes really good, especially with all the melted cheese oozing out. Makes me wonder how restaurants can get away with charging $20+ for something so simple.


Proscuitto, Spinach and Mozzarella Stuffed Chicken Breasts
SC's recipe


Chicken Breasts
Cheese of choice
Spinach, sundried Tomatoes, or another vegetable
Proscuitto, bacon, or another meat (optional)

Pound chicken breasts until flat and about 1 inch thin. Layer the filling/stuffing on one half of the chicken breast and fold. Tie stuffed breast together with a string or toothpick (we had neither, so used a wooden chopstick instead!). Season with salt and pepper. Broil for about 10-15 minutes, or until chicken is cooked.

Continue reading for recipe...

August 07, 2009

Nectarine and Cherry Galette


It is finally starting to feel like summer in San Francisco (damn those Indian Summers!) and as a result, all those beautiful summer fruit cobblers, pies and tarts that are always featured on the covers of Gourmet magazine are suddenly calling my name. AC and I usually prefer to eat our fruit fresh, but gosh -- throw a girl colorful pages and pages of gorgeous fruit tarts and bubbling cobblers, and you've got something she can't resist.


My mom would make galettes all the time growing up, and I used to not care for them that much. Back then, I much rather preferred a gooey ice cream sundae or an over-the-top birthday cake instead. But I guess I'm evolving (errr, maturing??) because over these past couple of years, I have grown to love food that is simple, understated and effortless.


A fruit galette is no exception. It's like a pie, but much more rustic and unstructured. I love how easy it is -- just throw some fresh fruit on pie dough, and you have this beautiful "tart" that looks like it took hours to make (well, maybe not mine...). The crust is crispy and flaky; the fruit filling juicy and not too sweet. I think I've just found my new obsession. More variations on this galette coming soon...:D


Nectarine and Cherry Galette
Recipe adapted from Rachel's Mother

1 C flour
1/2 t salt
8 T unsalted butter, refrigerated
4-5 T ice water

Peaches, berries, plums, etc
1-2 T flour
2 T sugar (or to taste)

Combine flour and salt and cut in butter until pieces are pea-sized. Add water 1 T at a time until the dough is moist but NOT sticky. Flatten dough into a disk, wrap in plastic, and refrigerate 20 minutes or so.

Preheat oven to 400 degrees, and prepare fruit (slice, pit, etc)

Roll dough into a 12 inch diameter, and transfer to a baking sheet. Leaving a 2 inch border, sprinkle dough with flour and 1 T sugar. Arrange fruit on top and sprinkle with remaining 1-2 T sugar, or to taste. Fold dough over the fruit about 2 inches to form a rim. Make sure there are no cracks where the juice can leak out. Sprinkle rim with a little bit of sugar.

Bake until well-browned and bubbly, about 25-30 minutes. Serve warm or room temperature, preferably with ice cream.


Continue reading for recipe...

August 04, 2009

Shrimp Pineapple Fried Rice


Pineapple fried rice is a popular dish that can be found in almost every Thai or Asian-fusion restaurant in the U.S. I actually associate this entree with my time in China, when I would frequently eat it at a neighborhood Uyghur restaurant near my dormitory.

Regardless of the location, pineapple fried rice is always a delicious treat for me. I love how the juicy pineapple chunks add a delicate sweetness to the bold undertones of curry, cilantro and chilies in the rice. Throw in some fresh shrimp and vegetables, and you have a colorful and flavorful meal that can be eaten for breakfast, lunch or dinner.

Now I'm a little embarrassed to admit, but I'll spill anyways (since I love ya'll so much!) -- we didn't actually use fresh pineapple and shrimp this time. I know, I know...what was I thinking?? I must have been quite delusional because substituting for those two key ingredients was a HUGE mistake. As a result, the pineapple which usually is light and juicy when fresh ended up being too sweet; the shrimp which usually soaks up all the juices/spices while cooking ended up tasting flat. Believe me, taking the extra step to use fresh pineapple and shrimp is so worth it! You will thank me in the end :)


Shrimp Pineapple Fried Rice
Recipe adapted from the wonderful Closet Cooking

Serves 4

1 T oil
2 shallots, sliced
3 cloves garlic (chopped)
1 red chili (chopped)
1 red pepper (diced)
2 eggs (lightly beaten)
3 tablespoons chicken stock (or vegetable broth)
3 tablespoons fish sauce (or soy sauce)
1 tablespoon curry powder
1 teaspoon sugar
1/2 cup cashews (roasted)
4 cups cooked rice (preferably a day old)
1 cup fresh pineapple (cut into bite sized pieces)
1 cup raw shrimp, de-veined and peeled
1/2 cup peas (fresh or frozen)
2 green onions (sliced)
1/4 cup cilantro (chopped)

Directions:
1. Heat the oil in a pan.
2. Add the shallots, garlic, chillies and red pepper and stir-fry until fragrant, about a minute.
3. Add the egg and stir-fry for a minute.
4. Add the shrimp and stir-fry until almost pink, about a minute.
4. Add the chicken stock, fish sauce, curry powder and sugar and stir-fry.
5. Add the cashews and stir-fry for 30 seconds.
6. Add the rice, break up any clumps and stir-fry for a few minutes.
7. Add the pineapple and peas and stir-fry to mix them in.
8. Remove from heat and serve garnished with chopped green onions and cilantro.
Continue reading for recipe...

August 01, 2009

Five-Spice Chicken w/ Soy Lime Dipping Sauce (and Green Bean Salad)


I love recipes that require marinating. Specifically, because I'm lazy...and marinating usually requires very little prep work :D It's also wonderful to come home from work to a practically pre-made dinner. Pop the marinated meat into the oven, and voila! -- dinner is ready. Not only does this make for a quick and easy supper, it also ensures that that your meat will be extra flavorful and moist since it's been marinating in sauces all day/night. It's all about the small investments, big returns.


This recipe was no exception. The marinade was easy, yet the combination of spices yielded a fresh, bold and complex flavor. Five-spice alone is fairly vibrant. But when paired with turmeric and freshly roasted star anise, the flavor becomes increasingly fragrant and explosive. I would highly recommend serving this dish with the Soy Lime Dipping Sauce that is supposed to accompany it. It offsets the chicken's "spicyness" perfectly with a bright and refreshing lime taste that has just the right amount of heat. I literally drowned every bite of chicken in it :)

Pair this with a simple green bean salad and white rice. The fluffy rice will soak up all the flavorful juices wonderfully.


Five-Spice Chicken
Adapted from Epicurious, August 2001

Makes 4 servings

2 lbs boneless, skinless chicken thighs
3 T vegetable oil
2 T soy sauce
3 T minced ginger
2 T minced garlic
2 T sugar
2 t ground turmeric
1 t Chinese five-spice powder
4 whole star anise, toasted and ground into fine powder

In a bowl, combine the oil, soy sauce, ginger, garlic, sugar, turmeric and five-spice powder. Stir well to blend. Add chicken pieces, coating them evenly. Marinate in the refrigerator overnight.

Broil the chicken for around 10 minutes, turning over occasionally. Transfer to a serving platter and serve with the dipping sauce.

Soy Lime Dipping Sauce
Adapted from Epicurious, 2001

1 clove garlic. minced
2 fresh Thai bird chilies, minced
2 1/2 T sugar
1/3 C soy sauce
2 1/2 T fresh lime juice with pulp
1/4 C water

Combine the garlic, chilies and sugar together in a small bowl. Add soy sauce, lime juice and water. Stir until well blended.

Green Bean Salad with Cilantro and Soy-Glazed Almonds
Bon Appetit, 1996

Serves 6

1/4 C whole almonds
4 t soy sauce

1 lb green beans, trimmed and cut into 2 inch pieces
3 T rice vinegar
1 t vegetable oil
1 large garlic clove, minced
1 t fresh ginger, minced
2 T thinly sliced green onions
1/3 C fresh cilantro leaves

Stir almonds in a medium non-stick skillet over medium heat until lightly toasted. Add 3 t soy sauce and stir until soy sauce evaporates and coats almonds. Cool and chop.

Cook beans in a large pot of salted boiling water for 5 minutes, until just tender. Drain and rinse under cold water. Whisk vinegar, oil, garlic, ginger, and remaining 1 t soy sauce in a large bowl to blend. Add green beans and toss to coat. Season generously with salt and pepper. Sprinkle almonds, green onions and cilantro leaves over salad and serve.
Continue reading for recipe...