Showing posts with label healthy. Show all posts

July 27, 2010

Chinese Garlic Pea Shoots + Kung Pao Chicken


Two posts in one week?? Yes, I'm pinching myself as well. What is this, 2009 or something? ;)

Anyway, I guess this really doesn't count as a post because #1, this is the easiest and fastest meal ever and #2, I don't even have an "official" Bon Appetit or Gourmet magazine recipe for it. But don't be fooled -- anything pulled from my mom's cooking files is legit (especially when it comes to food from da motherland). It's just that "a little pinch here" and "handful or two there" is kinda hard to translate into tangible quantities. But I'll try my best...


Back in the day, AC and I used to eat this all the time. It's fast, fresh, and so much better than your typical Chinese takeout or delivery. The secret to great Kung Pao chicken is the marinade -- or cornstarch, really. The Chinese (I say that like they're some exotic specimen) use cornstarch for nearly everything. Usually it's to help thicken soups or sauces. But in this case, it's combined with the marinade to create a protective coating around the chicken pieces so that the meat doesn't dry out when stir-fried. That's probably why chicken is always unusually moist, velvety and soft in Chinese restaurants -- it's all because of the cornstarch, baby!!

Of course, letting the chicken sit in the marinade for a couple of hours will also make a huge difference. Sherry is another big ingredient in Chinese cooking: whenever you use soy sauce, use equal parts sherry to offset the saltiness. For the Choi version of this marinade, we do equal parts soy sauce and sherry, a drip (or two) of sesame oil for sweetness, a double drip of hot chili oil (we like our food spicy), and some hot pepper flakes for even more kick. Pour this along with a spoonful or so of cornstarch over the chicken, and you're ready to go.


Btw, the pea shoots are equally wonderful and simple -- they were actually going to be the highlight of this post! But then I got so caught up and excited about the whole cornstarch shebang, I couldn't stop myself. Yup, really living on the edge here. Anyway, my "spoonful of this" and "pinch of that" recipe for pea shoots can be found below. Enjoy! :P

Chinese Garlic Pea Shoots + Kung Pao Chicken
Recipe by SC

Garlic Pea Shoots
1 plastic bagful of fresh pea shoots, rinsed with H20
8-10 cloves garlic, minced
2-3 T olive oil
1/8 C water
white pepper, to taste
garlic powder, to taste
salt, to taste
[measurements are approximations]

Pour a couple tablespoons of olive oil into a large frying pan so that it covers the entire bottom. Heat on high until the oil begins smoking. Add minced garlic and stir until it just begins to become fragrant, about 30 seconds. Add washed pea shoots and stir-fry until greens wilt, about 3-5 minutes. Add a splash of water and immediately cover the pan. This will create steam and further "soften" the vegetables. Steam for about a minute more. Uncover and season with white pepper, garlic powder, and salt.

Kung Pao Chicken w/ Cashews
2 chicken breasts, diced
2-3 cloves garlic, minced
1 zucchini, chopped
1 red bell pepper, chopped
1 yellow red pepper, chopped
1/2 onion, chopped
1/4 - 1/2 C cashews or peanuts
1/4 C soy sauce
1/4 C sherry
1/2 t sesame oil
1 t hot chili oil
1 t hot pepper flakes
1 1/2 T cornstarch
oyster sauce, to taste
[measurements are approximations]

Combine bottom six ingredients together in a bowl. Pour over diced chicken and let marinade for a couple of hours or overnight. Heat large pan over high heat until it begins smoking. Add minced garlic and stir until it just starts to become fragrant, about 30 seconds. Add chicken and marinade sauce into pan, and stir-fry until almost cooked through (about 3-5 minutes). Remove meat from heat.

Pour a couple teaspoons olive oil into the same pan. Once the oil becomes hot, add zucchini, bell peppers, and onion. Stir fry until vegetables become soft, about 3-5 minutes. Add chicken and cashews, mixing over heat for about 1-2 minutes more. Lightly sprinkle about 1-2 teaspoons oyster sauce over mixture and stir. Remove from heat and serve.
Continue reading for recipe...

January 16, 2010

Real Chicken Noodle Soup

I've been really sick this past week. Fever, migraine, chills, sore throat, body aches, coughing -- the whole nine yards. But guess what I woke up to that made being sick almost worth it?


Even the broth was made from scratch (and love) :D

If homemade chicken noodle soup can't make you feel better, I don't know what will! Once I get out of my delirious state, I'll have to bug AC for the recipe. Not that I'm biased or anything, but you'll definitely want this one. Until then, it's off to bed for some sleep, meds, and more sleep....


Cooking credit goes to this cutie; am I a lucky girl or what?! ;)
Continue reading for recipe...

November 11, 2009

Shaved Brussels Sprout Salad w/ Walnuts and Pecorino


Oh, brussels sprouts -- like everyone else, I love to hate you ;). Only, sometimes you surprise me...and taste really, really good.


Like when you're roasted with bacon, balsamic vinaigrette, and walnuts -- you're pretty tasty. Or even with just a sprinkle of salt, pepper, olive oil and rosemary, I can do you. But not raw. Never.


I don't know what got into me -- but I saw this raw brussels spouts salad recipe, and thought it was totally ingenious. It promised an unbelievably delicate slaw from the thinly sliced brussels sprouts, and a bright and refreshing flavor from the citrus dressing. I've never had brussels sprouts this way, and was so excited to try it out.

Well, I really should have known better....because if brussels sprouts are only "doable" doctored up, how can they ever taste better raw?? While the simplicity of the salad's other ingredients worked well together (olive oil, fresh lemon juice, grated pecorino romano, toasted walnuts), the bitterness of the brussels sprouts still managed to permeate their way through each mouthful. We were a little disappointed. However, this may be the perfect salad for people who already looooove brussels sprouts. It just wasn't for us.


It does make for a pretty presentation though, doesn't it? :P

Shaved Brussels Sprout Salad with Fresh Walnuts and Pecorino
Adapted from Gourmet, October 2005

1 lb Brussels sprouts, any discolored leaves discarded and stems left intact
1 cup walnuts (3 1/2 oz), lightly toasted
2 tablespoons finely grated Pecorino Romano, or to taste
1/4 cup olive oil
3 tablespoons fresh lemon juice

Holding each Brussels sprout by stem end, cut into very thin slices using slicer. Toss in a bowl to separate layers.

Lightly crush walnuts with your hands and add to Brussels sprouts along with cheese, oil, and lemon juice, then toss to combine. Season with pepper.
Continue reading for recipe...

October 30, 2009

Japanese Onigiri (Rice Balls)


Is it just me, or do most people feel the need to detox after traveling?? All that eating out (and of course, drinking) made both of us crave really simple, clean food again when we got back home.


If you're looking for something healthy -- but don't want to live on celery sticks and carrots for the rest of your life, Japanese food is one of the cleanest and healthiest cuisines out there. With very little oil or fat in it, it basically consists of rice, vegetables, and fish. No wonder why the Japanese are so darn skinny! :P

While we didn't have any fish on hand, we definitely had rice (a staple in our home!) and pickled vegetables. I love anything pickled...especially Japanese pickles and Korean kimchee. Slightly salty and sour, their acidity pairs perfectly with a bowl of plain white rice.


Rice balls always remind me of Hawaii, where along with spam musubi (mmmmmm), they're sold at every grocery store, gas station, and Seven Eleven on the island. Maybe it was the cold Chicago weather that made me nostalgic for Hawaii, because I suddenly wanted -- no needed -- rice balls in order to get my diet back on track. Simple, clean, and full of vegetables (well...pickled seaweed and cucumber vegetables that is!), it was the perfect "welcome home" comfort food that we were so desperately craving.

Japanese Onigiri (Rice Balls)
Recipe by SC

Rice
Furikake
Dried nori (seaweed)
Picked vegetables or fish

Add furikake to hot rice until thoroughly mixed. Using hands or rice mold, shape the rice mixture into a triangular or oval shaped ball. Stick your thumb in the middle to create a hole, and add desired filling into that space. Top with a little more rice, and wrap with nori.

Continue reading for recipe...

October 14, 2009

Spicy Chicken Claypot w/ Shiitake Mushrooms, Tofu and Napa Cabbage


You know when something's big and/or significant when it's all over Facebook. We've been having torrential downpours in the Bay Area for the past couple of days -- and I swear, everyone's Facebook status from around here was about the rain. I even had a friend in Japan ask, "Is everything ok in California? From all the Facebook status updates, it sounds like the world is going to end over there!" Which did seemed true at the time given the ominous dark clouds and never-ending sheets of rain. But also keep in mind that we live in California, and any hint of rain sends people into a hissy :)

Anyway, I actually love the rain because it reminds me of my childhood in Berkeley. It wasn't until I moved away to Chicago that I learned that rain does not equal winter, and winter is not always "pleasantly" cold. We've totally become wussies since moving from Chicago back to the Bay Area -- we were shivering in our apartment the other day, and I exclaimed, "It's freezing outside! How cold do you think it is?" To which AC responded, "Yeah, must be in the 50's today...probably not that much colder than Chicago." We looked up the weather online, and it ended up being 61 degrees! Chicago was only 48 degrees; how embarrassing. This does not bode well for our upcoming trip to Chicago in a couple of weeks...


Regardless of what the actual thermometer read (I swear it was colder than 61 degrees!), it still felt chilly enough to get our "fall/winter" appetites out in full force. AC has this killer chili recipe which I will post about later. But for now, here is an equally delicious and comforting cold-night dinner dish: Chinese chicken claypot.

What I love most about this claypot is its bold and flavorful sauce. The spiciness comes from the ginger and star anise, the lingering heat comes from the generous dose of sriracha sauce, the subtle sweetness comes from the hoisin sauce, and the heartiness comes from all the leftover braising juices and chicken broth. Soaking up this rich and complex broth are juicy chunks of chicken, soft and pillowy shiitake mushrooms, tender napa cabbage, and spongy pieces of tofu. There is something so soothing and comforting about this, especially on a cold rainy night.

Slurp up, my friends -- and stay dry!

Spicy Braised Chicken with Mushrooms and Star Anise
Recipe adapted from Bon Appetit, January 1999

1 tablespoon peanut oil
8-10 boneless, skinless chicken thighs
12 ounces fresh shiitake mushrooms, stemmed, caps quartered
2 cups chopped green onions
2 tablespoons minced garlic
1 tablespoon minced peeled fresh ginger
2 14 1/2-ounce cans low-salt chicken broth
1/2 cup hoisin sauce
4 whole star anise

6 cups 3/4-inch-wide strips Napa cabbage (about 1 small head)
7 oz (half a container) tofu, cubed
1-2 tablespoon sriracha chili sauce, or to taste

Heat peanut oil in heavy large pot over medium-high heat. Add chicken; sauté until brown, about 4 minutes per side. Transfer to bowl. Add mushrooms, 1 1/2 cups green onions, garlic and ginger to pot. Sauté until mushrooms are tender, about 5 minutes. Return chicken to pot. Add chicken broth, hoisin sauce and star anise. Bring to boil. Reduce heat, cover and simmer about 1+ hour.

Remove chicken from pot; cool slightly. Cut meat crosswise into 1/2-inch-wide strips.

Meanwhile, boil mixture in pot until reduced to 2 1/2 cups, about 30 minutes. Stir in cabbage, tofu and chili sauce. Boil until cabbage is tender, about 4 minutes. Return chicken to pot; simmer until heated through, about 2 minutes. Transfer to bowl. Discard star anise. Sprinkle with remaining 1/2 cup green onions.
Continue reading for recipe...

October 02, 2009

Homemade Dark Chocolate-Matcha Green Tea Truffles


This was another treat that we brought with us to NYC...and thank goodness we did. Because if we had kept these for ourselves, they would have been gone in 5 minutes. No joke.


Lately, I've been on this crazy matcha green tea kick where I seem/want to think that it goes with everything -- green tea granola, marshmallows, yogurt, chocolate, noodles (kidding...well, kinda). I blame it on my heritage, but in reality, it's a flavor that is gaining increasing popularity and appeal. I mean, if Starbucks is now serving matcha green tea beverages, it must be good!


Anyway, I think dark chocolate + green tea is a delightful and elegant flavor that gives classic duos like salt-caramel or chocolate-raspberry a run for their money. This truffle's creamy chocolate ganache is infused with a delicate green tea flavor, and the matcha powder coating heightens the intensity of both the dark chocolate and green tea. Unlike Godiva chocolates that have a too hard exterior and too runny interior (in my opinion), these indulgent ganache truffles have a more consistent texture where the entire truffle is this little soft morsel that literally melts in your mouth.


Isn't it pretty? Oh, and did I mention that dark chocolate and green tea are also healthy for you? Maybe we should have saved these for ourselves after all... :)

Green Tea Dark Chocolate Truffle
Recipe from The Food Channel

1/3 C heavy cream
1/4 C sugar
1/2 t matcha green tea
7 oz high quality Dark Chocolate (I used 70% Scharffen Berger), finely chopped
Matcha green tea, as needed to coat truffles

Combine cream, sugar, and 1/2 t matcha green tea in nonstick sauce pan and whisk to blend. Bring to a boil, stirring constantly; remove from heat. Immediately add 5 ounces fine chopped chocolate to hot cream mixture and gently stir to blend. Spread chocolate/cream ganache mixture in shallow dish and refrigerate until firm to touch.

Shape chilled chocolate ganache mixture into balls (using a melon scooper) and arrange on plate or baking sheet lined with wax paper. If chocolate ganache gets too soft to roll into balls, refrigerate briefly.

Freeze truffles until firm. Melt approx 2 oz chopped chocolate in top of double boiler. Dip frozen truffles in chocolate to lightly coat. Cool. Roll cooled truffles in matcha green tea powder to lightly coat. Store truffles in refrigerator until ready to serve.


Continue reading for recipe...

September 13, 2009

Korean Banchan: Cucumber Salad + Bean Sprout Side Dishes


Wow. I've just been a lean, mean Korean-cooking machine lately! Not only did I make kimchi jjigae this week, but I also ventured into the world of banchan. This is another dish that AC usually makes...but as said before, watch and learn baby! ;)

Korean banchan, or all the little side dishes that come out with your meal, is one of my favorite things about eating at Korean restaurants -- it seriously makes you feel like a king! I love looking around the table, and seeing 10+ dishes sitting out with your main order. If you're greedy like me, it is theee way to eat :)

Anyway, we sometimes buy our banchan from Korean grocery markets so that we can eat them at home as well. They're always good...but a little expensive for what you get. So lately, AC has been making some of the banchan dishes himself -- and I actually think they taste BETTER than the store bought kind. These are my two favorites. As you can see, they are ridiculously delicious and easy to make.

Cucumber Salad
Recipe by AC/SC

5 large English cucumbers (10 mini cucumbers)
1/4 C rice vinegar
1 T sugar
1 clove garlic, minced
1 T sesame seeds
1 T sesame oil
1/2 T kochu'karu (hot red pepper powder)
1 wedge lemon

Seed the cucumber, and slice into thin disks. Place cucumbers in a large bowl and sprinkle evenly with sea salt (about 1/4 T). Let sit for 15 minutes, and the wrap the cucumbers in a paper towel and squeeze out as much liquid as possible. Set aside.

Combine rice vinegar, sugar, garlic, sesame seeds, sesame oil, and kochukaru in a medium bowl. Add cucumbers and toss well. Squeeze lemon juice over salad. Cover and refrigerate.


Bean Sprout Side Dish
Recipe adapted from Week of Menus

1 bag of bean sprouts
2 tablespoons of water
1 tablespoon of vegetable oil
1/4 teaspoon salt
3 cloves of garlic finely chopped
2 green onions finely chopped
1 tablespoon of sesame oil (you can add more if you like the taste)
1/2 T crushed toasted sesame seeds

Wash beansprouts. Place beansprouts, water, vegetable oil and salt in the bottom of a very heavy pot. Cover pot and place on medium high heat. Cook until you see steam escaping from the pot (or you begin to smell the bean sprouts) and reduce heat to medium. Cook for around 10-15 minutes with the lid on.

While still hot, add the garlic, green onions, sesame oil, and sesame seeds. Mix. Adjust seasonings as necessary. Serve immediately.
Continue reading for recipe...

September 03, 2009

Beet Salad with Goat Cheese and Balsamic Vinaigrette


I think the smell of roasted beets might possibly be the most glorious thing to ever come from my oven. Even better than baked goods (and that's saying a lot, considering how much I love my sweets). It's absolutely lovely, and I seriously think someone should make a candle scent after the smell. :P NOT KIDDING!

Anyway, I actually just discovered beet salad about a year ago when my friend ordered it for lunch. What the hell is that, I asked. She let me try a bite (or two), and I was hooked. Soft and buttery, roasted beets are as sweet as fruit -- only they're vegetables. I think beets are tasty enough to eat plain...but when served with soft goat cheese in a tangy balsamic vinaigrette, they are absolutely divine! I added chopped walnuts for extra protein, but I think little bits of juicy mandarin oranges would be even better :)


Beet Salad with Goat Cheese
Adapted from Bon Appetit, June 2000

8 beets
1/4 C white wine vinegar
1/2 t sugar
1/4 C vegetable oil
1/8 C olive oil
1/4 red onion, thinly sliced
crumbled goat cheese, to taste

Preheat oven to 375°F. Wrap beets tightly in foil packages (3 beets in each). Place on baking sheet. Roast beets until tender, turning packages occasionally, about 1 hour 45 minutes. Unwrap beets; cool completely. Peel beets and cut into 1/4-inch-thick rounds. Place in large bowl.

Combine vinegar and sugar. Gradually blend in vegetable oil, then olive oil. Season vinaigrette to taste with salt and pepper. Toss beets and sliced onion in vinaigrette. Sprinkle with goat cheese and serve.
Continue reading for recipe...

August 28, 2009

Mediterranean Eggplant and Quinoa Salad


I've been wanting to try quinoa for a while, and I finally got around to it this week. Besides learning how to cook it, I also learned how to pronounce it...which, believe me, is a much harder task. How am I supposed to know that "quin-noa" is actually pronounced "keen-wa?" Good thing I've been saying quin-noa my whole life without anyone correcting me. Ya know, I absolutely loooove mispronouncing words in front of my coworkers and stuff.

Like its pronunciation, quinoa also looks deceptive. I mean, just look at the picture -- you can't even try to tell me that looks appetizing! But surprisingly, it's really delicious. And healthy, which is double bonus points in my book:

1 C white rice: 4 grams protein, 1 gram fiber
1 C brown rice: 5 grams protein, 4 grams fiber
1 C quinoa: 8 grams protein, 5 grams fiber

I think what makes this dish so tasty is the eggplant. We LOVE eggplant, especially the soft, succulent, melt-in-your-mouth kind. Couple this with some hearty quinoa, spicy red onions, juicy tomatoes, lemon juice, and fresh mint -- and you have a wonderfully complex "salad" that fills you up within a couple of mouthfuls. Sounds like a winner to me :)

Mediterranean Eggplant and Quinoa Salad
Adapted from Gourmet, September 2006

1 1/2 lb eggplant, cut into 1-inch cubes
3/4 lb zucchini, cut into 1-inch cubes
10 T extra virgin olive oil
1 t salt
1 t black pepper
1 C chopped scallion (from 1 bunch)
1 1/2 t ground cumin
1/2 t ground coriander
1/4 t cayenne pepper
1 C quinoa
1 1/3 C chicken broth
2 T fresh lemon juice
1 garlic clove, minced
1/4 t sugar
1/2 lb cherry tomatoes, quartered
1/2 C thinly sliced red onion
1/2 C chopped fresh mint

Roast eggplant and zucchini:
Put oven racks in upper and lower thirds of oven and preheat oven to 425°F.

Toss eggplant and zucchini with 5 tablespoons oil, 3/4 teaspoon salt, and 3/4 teaspoon pepper in a bowl, then spread in 2 oiled large shallow (1-inch-deep) baking pans. Roast vegetables in oven, stirring occasionally and switching position of pans halfway through baking, until vegetables are golden brown and tender, 20 to 25 minutes total. Combine vegetables in 1 pan and cool, reserving other pan for cooling barley.

Cook quinoa:
Heat 2 tablespoons oil in a 3- to 4-quart heavy pot over moderately high heat until hot but not smoking, then cook scallion, cumin, coriander, and cayenne, stirring, until fragrant, about 1 minute. Add barley and cook, stirring until well coated with oil, 2 minutes more. Add broth and water and bring to a boil. Reduce heat and simmer, covered, until all of liquid is absorbed and barley is tender, 30 to 40 minutes. Remove from heat and let stand, covered, 5 minutes. Transfer to reserved shallow baking pan and spread to quickly cool, uncovered, to room temperature, about 20 minutes.

Make dressing and assemble salad:
Whisk together lemon juice, garlic, sugar, and remaining 1/4 teaspoon salt, 1/4 teaspoon pepper, and 3 tablespoons oil in a large bowl. Add barley, roasted vegetables, and remaining ingredients to bowl with dressing and toss until combined well. Serve with cheese slices.

Continue reading for recipe...

August 12, 2009

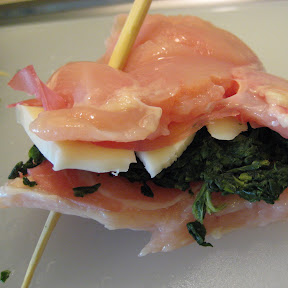
Chicken Stuffed With Prosciutto, Spinach and Mozzarella


What do you do when you have a couple of chicken breasts, some frozen spinach, and leftover cheese and prosciutto in your fridge? Why make stuffed chicken breasts, of course! ;)

Given the economic climate, AC and I have been trying our best to stay as prudent about our expenses as possible. We hardly eat out (you'll know when we blog about it), and we do our best to ensure nothing gets wasted (it expired last week? it's fiiiiine). This post is no exception. While stuffed chicken is not one of the sexier, more inspirational dishes out there -- it is certainly fast, economical, and healthy.


When I said what do you do with a couple of chicken breasts, some frozen spinach, and leftover cheese and prosciutto.... I, literally, really meant it. Take all the garbage -- I mean leftovers -- from your fridge and stuff it into a chicken breast. It actually tastes really good, especially with all the melted cheese oozing out. Makes me wonder how restaurants can get away with charging $20+ for something so simple.


Proscuitto, Spinach and Mozzarella Stuffed Chicken Breasts
SC's recipe


Chicken Breasts
Cheese of choice
Spinach, sundried Tomatoes, or another vegetable
Proscuitto, bacon, or another meat (optional)

Pound chicken breasts until flat and about 1 inch thin. Layer the filling/stuffing on one half of the chicken breast and fold. Tie stuffed breast together with a string or toothpick (we had neither, so used a wooden chopstick instead!). Season with salt and pepper. Broil for about 10-15 minutes, or until chicken is cooked.

Continue reading for recipe...

July 23, 2009

Kimbap + Sesame Roasted Edamame


After our friend's extravagant Polish dinner party the other week (complete with Polish music and vodka shots...not kidding), we really just needed some good ole' rice and veggies to detox from all that meat. :P Not that we're normally huge vegetable eaters. But I would gladly eat this flavorful edamame on a daily -- ok weekly, basis.


I also decided to make kimbap because it's relatively quick, makes a lovely light meal or snack, and is chock-full of veggies! Kimbap is a popular Korean staple that is similar to Japanese futomaki, but (in my unbiased opinion) tastes much better. I think the difference is that futomaki uses larger amounts of rice vinegar and is served with wasabi soy sauce, while kimbap has more sesame oil and usually contains fishcake or meat in it as well. It's really addicting, and goes perfectly with edamame for a utensil-less meal! :D


Sesame Roasted Edamame
My mother's recipe

Serves 6 generously

2 bags (1 lb each) frozen edamame, in pods
2 T soy sauce
2 T rice vinegar
1 T sesame oil
1 T toasted sesame seeds
Kosher salt, to taste

Spread frozen edamame on on baking sheet, and cover loosely with foil so steam can escape during roasting. Bake in pre-heated 375 degree oven for 15 minutes. Remove foil and roast an additional 15-20 min, until slightly brown. Whisk together vinegar, sesame oil and soy sauce in a small bowl. Drizzle over hot soybeans and toss to coat. Add sesame seeds and salt.


Kimbap
AC's recipe

Makes around 8-10 rolls

4 C sushi rice
2 T rice vinegar
2 T sesame oil
1/2 t soy sauce

1 bunch spinach
1 t sesame oil
1 t soy sauce
1 t sesame seeds


2 carrots, julienned
1 english cucumber, sliced
3 eggs
1 pickled radish (daikon), sliced
fish cake or spam, sliced
6-8 roasted seaweed sheets (nori)

Cook rice and let cool 20 minutes. Mix in rice vinegar, sesame oil, and soy sauce. Set aside. Blanch spinach (boil for 1 minute and immediately rinse with cold water) and toss with sesame oil, soy sauce, and sesame seeds. Set aside. Beat eggs and fry into a flat pancake. Slice omelet into thin strips. Set aside.

Place the nori shiny-side down on the sushi mat. Spread a thin layer of rice on top so about 2/3 of the seaweed is covered. Lay carrots, eggs, cucumbers, fish cake, spinach and daikon close to the bottom. Roll sushi mat from the bottom, like a sleeping bag. Cut and serve.

*
Most kimbap recipes can be easily adapted to suit your individual tastes. Similar to a sandwich, feel free to add or take out different vegetables, meats, etc.

Continue reading for recipe...

July 16, 2009

Blueberry Maple Granola


This should really be a post about how AC thinks everyone in California wears Birkenstocks and eats granola all day :P But regardless of his misconception, I think I'm getting closer to my perfect bowl of granola.


Some people like their granola really soft so it turns slightly soggy when mixed with yogurt or milk. Some like it on the other extreme, where it almost hurts your teeth because it's so crunchy (even when in yogurt/milk!). I like it somewhere in between, but definitely with a lot of clusters.

While this granola recipe didn't yield as many clusters as I had hoped for (more on this later), its flavor turned out better than most of my 4-5 previous attempts at homemade granola. I think that's because this recipe tells you to toast the nuts separately from the oat mixture, and then add them in with the dried fruit at the very end. This prevents the over/under baking of "goodies" that usually happens when you mix everything together in the beginning and bake in one big batch.


Extreme Granola
Adapted from Epicurious, July 2008

Makes about 7 cups

1 C almonds
4 C old-fashioned rolled oats
4 T unsalted butter
1/3 C pure maple syrup or honey
1/2 C dried blueberries
1/2 C dried cherries (or other fruit such as dates, cranberries, etc.)
1/4 C sweetened shredded coconut

Preheat the oven to 375 degrees, and line a large shallow baking sheet with foil. Spread the nuts on the sheet and roast for 8-10 minutes, until lightly toasted. Transfer browned nuts to a board and chop. Set aside.

Reduce the oven temperature to 300 degrees. Melt the butter in a small saucepan and stir in the maple syrup. Mix this syrup with the oats and shredded coconut. Pour mixture onto the baking sheet and spread out evenly. Bake for 30 min, stirring once with a spatula halfway through, until the oats are lightly colored. Let cool; toss with dried fruit and nuts.

*For crunchier granola, add 1-2 egg whites to the oat mixture before baking
** I've read that you can create more clusters by adding H20 to the mixture. Essentially the wetter the oats, the more likely they will cluster. I love my clusters -- so I'll test out this water theory next time, and let you know how it works...
Continue reading for recipe...